
Ok, I like Icom equipment. One unit I am looking at is relatively inexpensive and small and with minimum of small buttons. However, the most impressive thing is that it has a built in sound card so it will interface with your computer via one USB A to B cable. That is it!
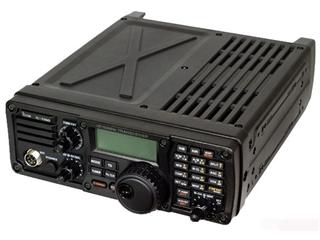
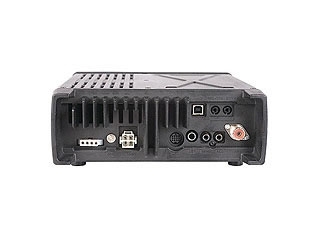
So what does a IC-7200 look like? Here it is for one view and a few words as to its market position: The latest IF DSP technology is employed in the IC-7200. While the IC-7200 is an entry-class transceiver, advanced digital features are comparable to higher class transceivers. The rugged design of the IC-7200 means your enjoyment of this rig is not limited to your shack only. Full break-in, selectable CW carrier point (USB or LSB) and adjustable CW pitch are also standard.
Here is a link to the product website so you can research things a little further if you desire. Well, what do you do with this radio once it comes on to the boat (or car or home)? This is the hard part. You need an antenna and an antenna tuner. The antenna is a pretty obvious requirement. So what is the antenna tuner?
The antenna tuner is required since you are going to operate in multiple bands over a wide range of frequencies with a fixed length antenna. The antenna tuner makes sure the impedance of the antenna matches the 50 ohm transmit impedance of the radio. This link is to the AT-4 .

Now comes the antenna, mounting of the antenna and getting the feedline from the antenna to the antenna tuner described above. This is one of the real mind twisters for me since my rig is for primary use on a sailboat. You just do not go punching holes willy nilly in an expensive sailboat that are prone to get water in the decks - which makes them lose value real quick. The antenna which I propose to use is a "rope antenna" which is just a piece of wire inside a line like a halyard. This piece of wire must be at least 23' but it is better if it is longer. In my case my mast is 52' tall so I think I will use a halyard to pull the line to the top of the mast and attach it to the backstay about 3 feet or less from the mast. Route the feedline from the antenna tuner to the connector on the rope antenna. Once the antenna feed line is connected to the antenna tuner you must do two things: 1) connect the tuner to the radio via a piece of feedline (easy by this time) and 2) add a counterpoise which adds the "other half" of the antenna system. The counterpoise is VERY important and relatively artsy in construction. There are two ways to do it - one easy and one difficult.
Of course the difficult way is probably the best and that consists of running a 2" piece of thin copper sheeting from stern to bow below the waterline on the port side and the same on the starboard side. This sheeting is connected to the ground lug on the antenna tuner via a soldered piece of 2" cooper sheeting (do not use wire to do this even though it is tempting). Remember this is not a DC or AC ground system so DO NOT connect it to the ship ground buss anywhere.
The easy method is to buy a KISS tuned counterpoise cable for about $150. A link to the site is given here. Once this is done you are pretty much ready to fire up the rig and start talking HF. I conviently left out all the connections of DC Power to the rig and the painful details like mounting the devices somewhere accessible but unobtrusive.

However, you did not buy this HF radio just to talk on it to other amateurs around the world. No indeed, you bought it to send and receive emails, weather faxes, CW and PSK messages. So you need a computer, a cable and some software. DO NOT connect the radio and computer at this time or you will regret it. First download the drivers and control software. To make this seemingly impossible task easier review the video below and understand it before proceeding with any connections between devices.
So what does a IC-7200 look like? Here it is for one view and a few words as to its market position: The latest IF DSP technology is employed in the IC-7200. While the IC-7200 is an entry-class transceiver, advanced digital features are comparable to higher class transceivers. The rugged design of the IC-7200 means your enjoyment of this rig is not limited to your shack only. Full break-in, selectable CW carrier point (USB or LSB) and adjustable CW pitch are also standard.
Here is a link to the product website so you can research things a little further if you desire. Well, what do you do with this radio once it comes on to the boat (or car or home)? This is the hard part. You need an antenna and an antenna tuner. The antenna is a pretty obvious requirement. So what is the antenna tuner?
The antenna tuner is required since you are going to operate in multiple bands over a wide range of frequencies with a fixed length antenna. The antenna tuner makes sure the impedance of the antenna matches the 50 ohm transmit impedance of the radio. This link is to the AT-4 .
Now comes the antenna, mounting of the antenna and getting the feedline from the antenna to the antenna tuner described above. This is one of the real mind twisters for me since my rig is for primary use on a sailboat. You just do not go punching holes willy nilly in an expensive sailboat that are prone to get water in the decks - which makes them lose value real quick. The antenna which I propose to use is a "rope antenna" which is just a piece of wire inside a line like a halyard. This piece of wire must be at least 23' but it is better if it is longer. In my case my mast is 52' tall so I think I will use a halyard to pull the line to the top of the mast and attach it to the backstay about 3 feet or less from the mast. Route the feedline from the antenna tuner to the connector on the rope antenna. Once the antenna feed line is connected to the antenna tuner you must do two things: 1) connect the tuner to the radio via a piece of feedline (easy by this time) and 2) add a counterpoise which adds the "other half" of the antenna system. The counterpoise is VERY important and relatively artsy in construction. There are two ways to do it - one easy and one difficult.
Of course the difficult way is probably the best and that consists of running a 2" piece of thin copper sheeting from stern to bow below the waterline on the port side and the same on the starboard side. This sheeting is connected to the ground lug on the antenna tuner via a soldered piece of 2" cooper sheeting (do not use wire to do this even though it is tempting). Remember this is not a DC or AC ground system so DO NOT connect it to the ship ground buss anywhere.
The easy method is to buy a KISS tuned counterpoise cable for about $150. A link to the site is given here. Once this is done you are pretty much ready to fire up the rig and start talking HF. I conviently left out all the connections of DC Power to the rig and the painful details like mounting the devices somewhere accessible but unobtrusive.
However, you did not buy this HF radio just to talk on it to other amateurs around the world. No indeed, you bought it to send and receive emails, weather faxes, CW and PSK messages. So you need a computer, a cable and some software. DO NOT connect the radio and computer at this time or you will regret it. First download the drivers and control software. To make this seemingly impossible task easier review the video below and understand it before proceeding with any connections between devices.
In retrospect, I think this entry should be in my blog on Marine Technology but I will leave it here for now since it is easier to add Youtubes to this blog..


No comments:
Post a Comment